We support the DIY movement. When a DIY makes sense— by all means, go for it. Damn straight if we don’t pucker every time we drill into a fresh ski during a binding mount. It’s at once unnerving and exhilarating. Does it require a mind worthy of NASA-level engineering to pull off? No. But certainly, muster up any equanimity you can. Mounting tech bindings sans jig is no joke. Have a steady hand and the right tools, measure three times (practice on a 2″ x4″), and drill once.
The binding mount with a paper template dance is part precise choreography and a leap of faith. You must trust yourself. In some cases, maybe you’ve botched a binding mount or three, DIY tech binding mounts need a 3-D printed assist. The High Route put Nat Mottaz’s 3-D printed jig through the wringer.
Mottaz, an engineer based outside Seattle, offers a compromise for those too stressed to use a paper mount and those unwilling to pay for a crisp mounting jig from a manufacturer. He’ll 3D print specific mount patterns upon request. Mottaz’s effort is worth considering at well under $100 for the setup.
Access SCAD files for the mostly printable ski binding jig.
Link to a short video of the jig in use and images of an early iteration of the jig.
We requested hole patterns for ATK and Plum bindings, as those bindings were making the rounds as we transitioned from winter to spring.
For the real deal DIYrs, with access to 3-D printing, Mottaz’s printing files are public, as is the parts list. You can find all that information here.
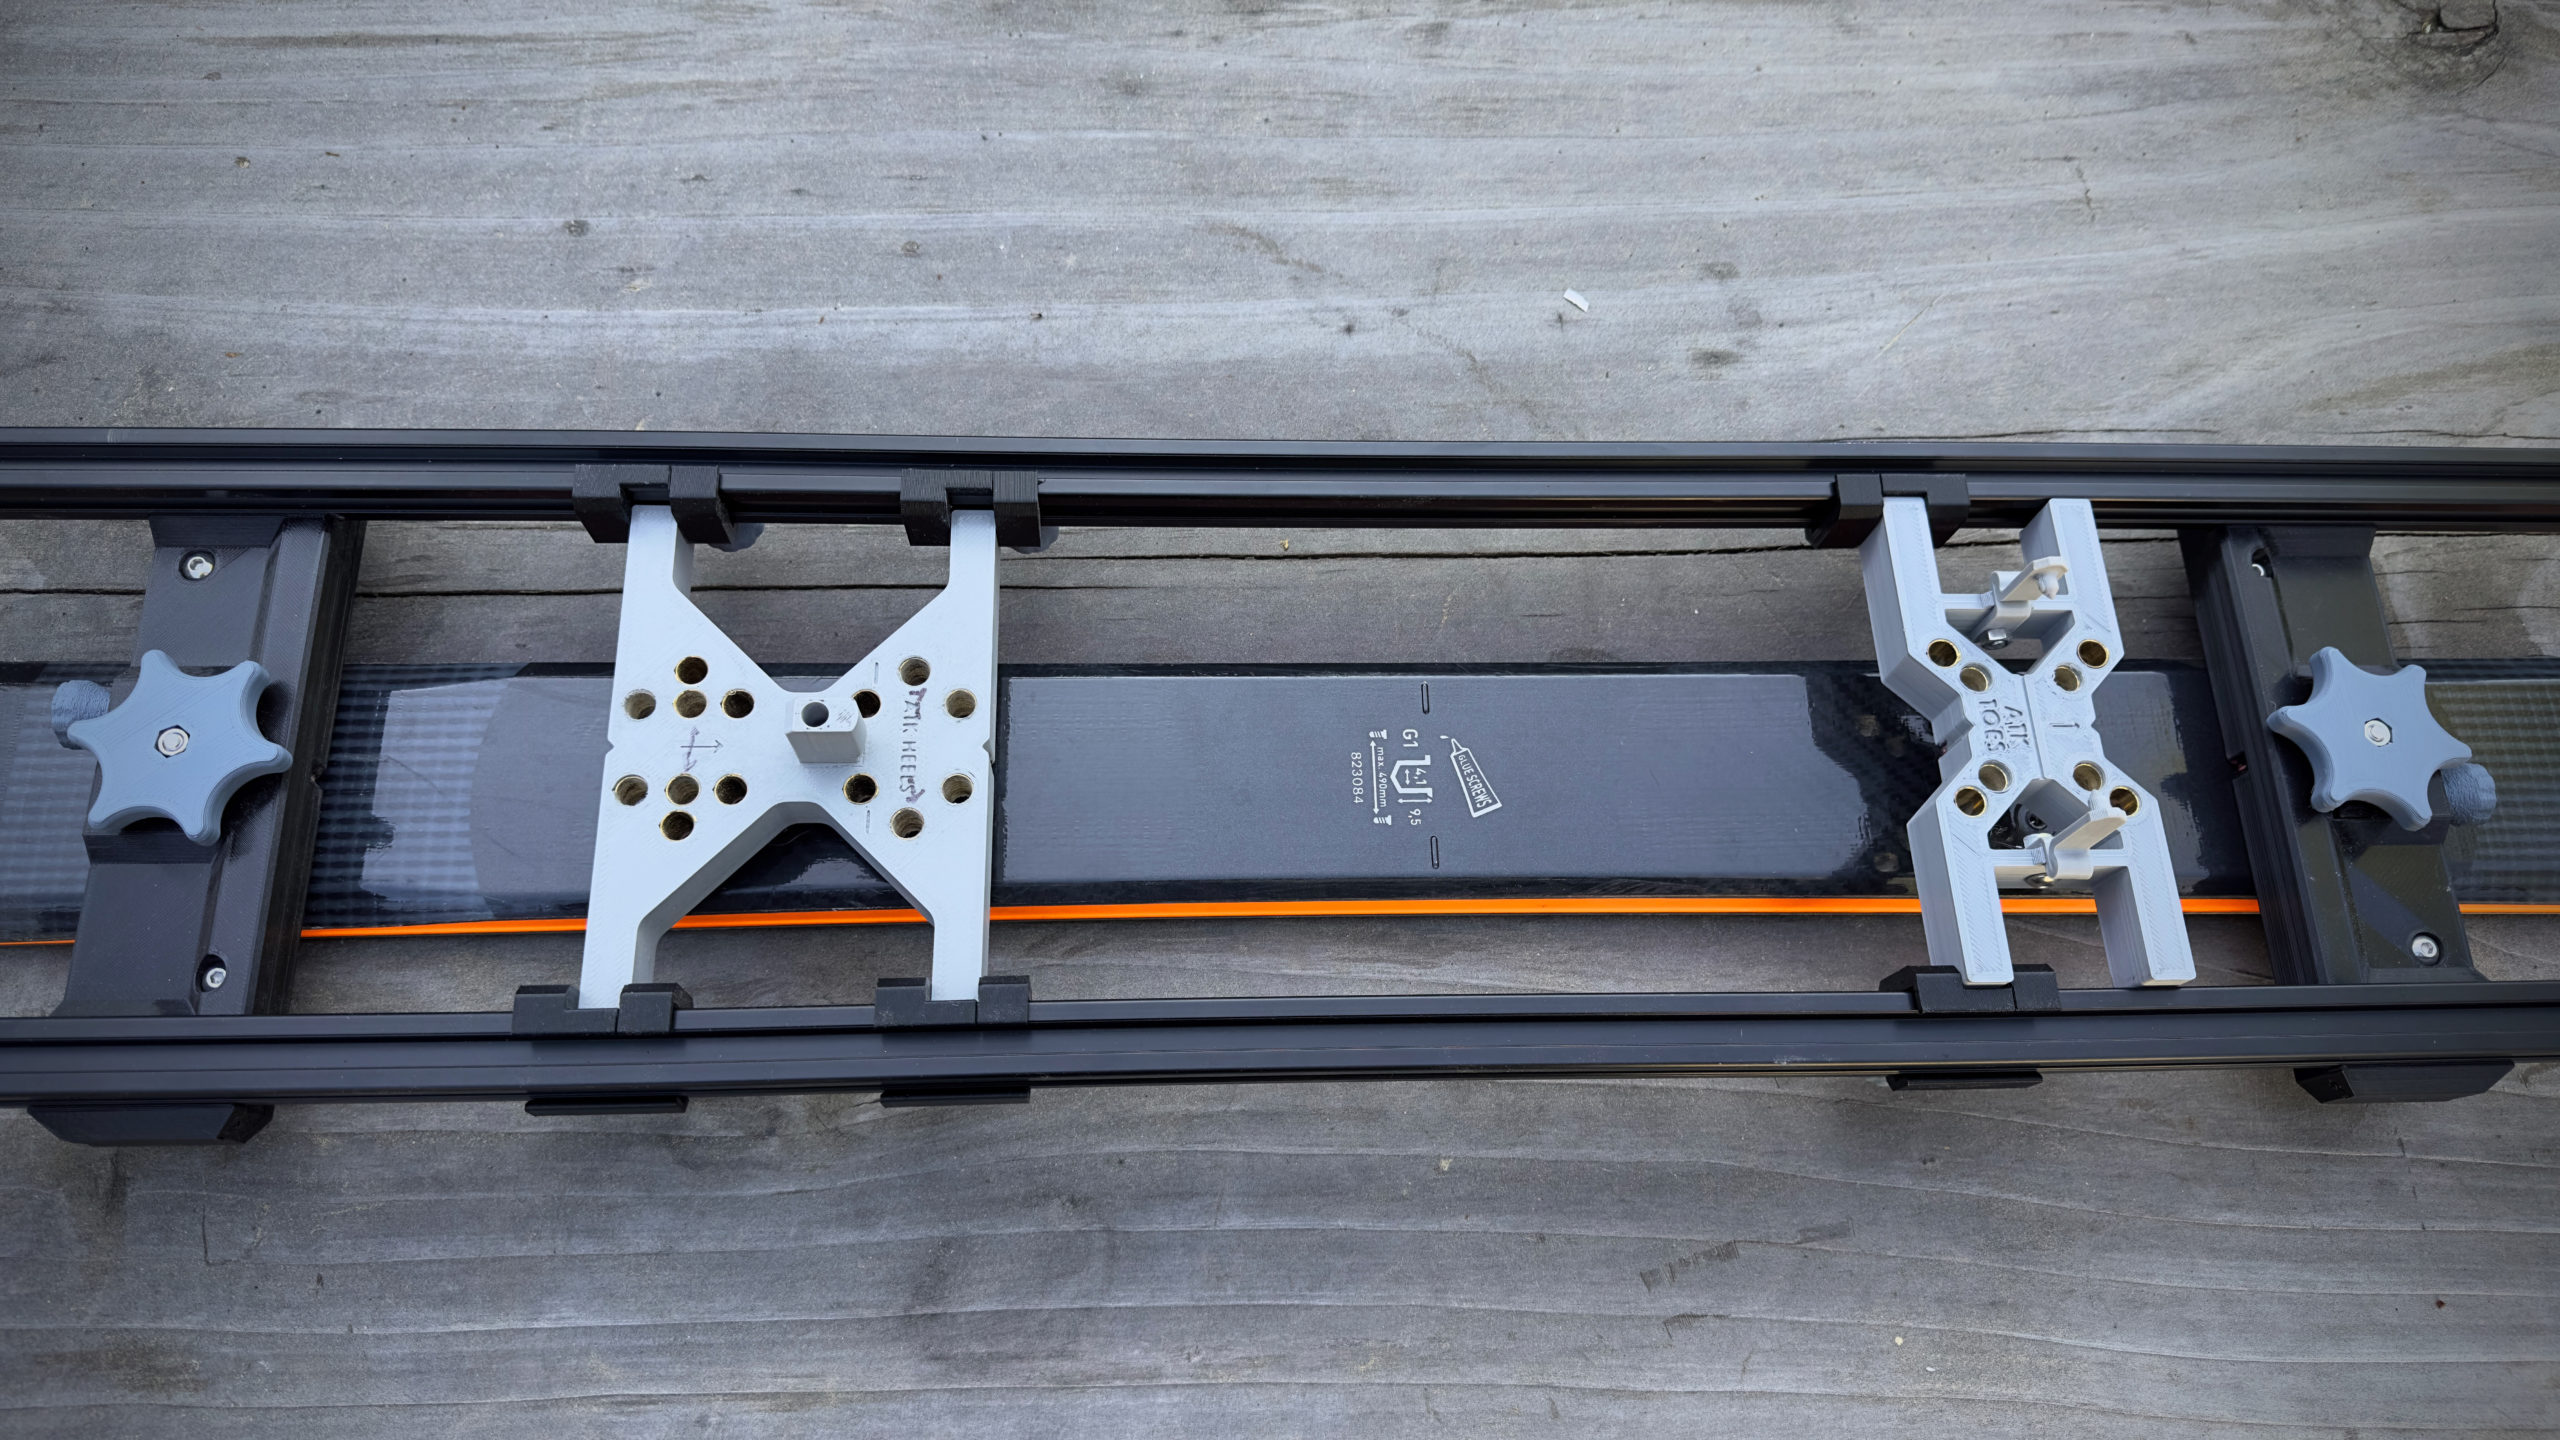
We’ll let captioned photos tell the story for much of this review. Consider the jig sturdy and savvy. Two aluminum 2020 T-slot profiles serve as the jig’s spine. Two centering clamps (these aid in centering the jig on the ski) are easily adjustable. Turn the adjustment knob until the center clamps grip the ski. A reminder, there’s no need to overtighten the clamps. Although the adjustment knobs are sturdy, this is, after all, 3D-printed plastic.
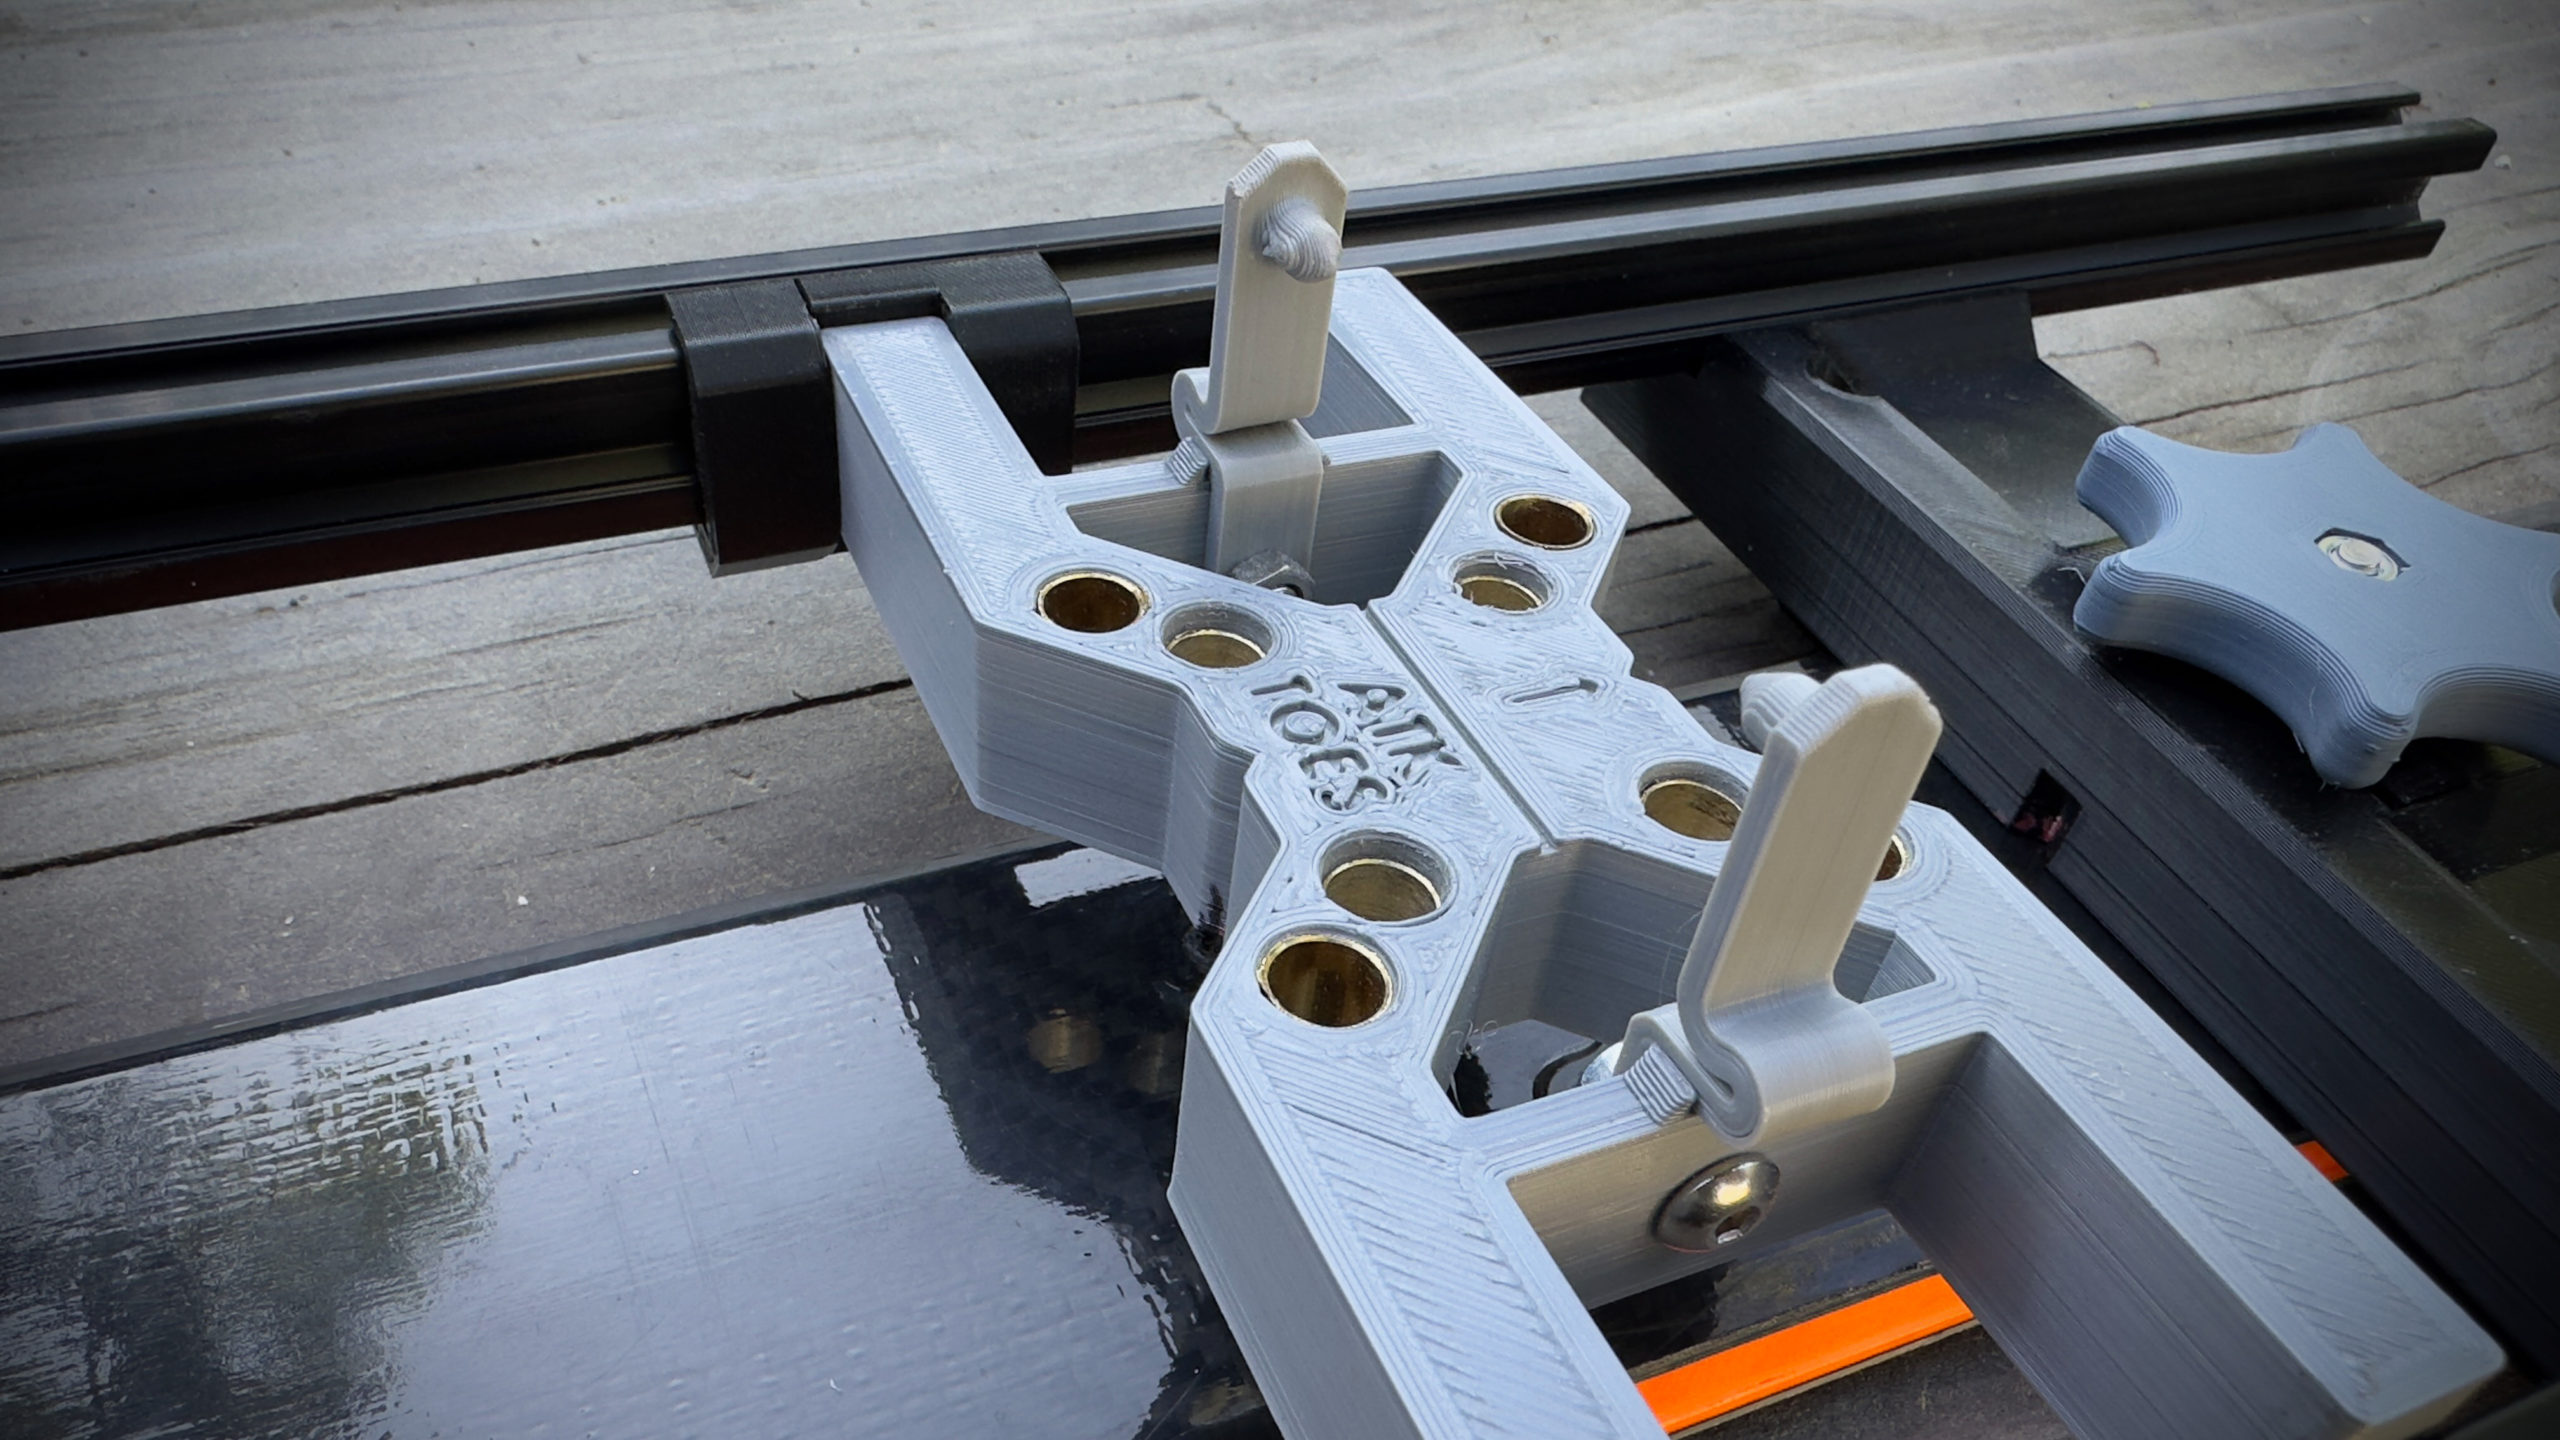
Sandwiched between the two centering clamps, are two sliders that move along the T-slot frames. One slider houses the mounting pattern for the binding heel unit, and the other houses the toe unit’s hole pattern. The binding templates have some built-in vertical float to accommodate different ski shapes and thicknesses. Once in position —the boot is aligned properly on the ski— tighten the slider pieces so they don’t budge when drilling.
The Mounting Process
Align the Boot and Ski
This brings us to the critical part; ensuring the slider pieces are correctly adjusted. Have no fear; that’s not an arduous task. Unlike using a paper jig, where one of the most demanding steps is locating the centerline of the ski running tip to tail (or at least through the binding mount zone), you need to ensure the boot’s midsole is aligned with the midsole mount mark on the ski. Most ski brands make this easy: they mark the factory-recommended midsole mount point for you.
If you choose to mount your boot fore or aft a bit, depending on your skiing style and the ski model, you’ll have to mark that on your own. That, too, is relatively easy. For example, if you want to mount 1.5cm forward, draw a line across the ski (from edge to edge) with a straightedge, marking a new forward mount point. That new mount point should be 1.5cm forward of the factory-recommended point.


The jig includes a center slider to place and secure over the ski’s factory-determined mount point or your preferred mount point once marked. Mottaz calls this slider a center position placeholder. The placeholder makes it easier to align the boot’s midsole point once it is secured in the toe and heel slider. We, however, did not use the center position placeholder.
Next, insert the plastic toe pins into the boot toe inserts. Don’t force it here, as the pins are plastic. Adjust the toe slider until the boot sole’s center mark aligns with the ski’s mounting mark. Secure the front adjustment slider in place (it has two adjustment knobs that are tightened.)


Now slide the heel unit slider towards the boot heel until the heel bumper (the vertical plastic tower on the heel slider) is snug up against the boot. Once in place, tighten the heel slider’s four adjustment knobs.
You’re almost there in only these few steps. We need to remove the boot from the jig first. Although the sliders and clamps are tight, it’s best not to remove the boot from the toe unit aggressively. What’s key is not to move the toe slider (or heel slider) along the T-slots during boot removal; this will throw off the mount alignment. It is worth repeating; slowly remove the boot.
With a fine single malt set on the workbench, master binding mounter Barry Wicks works his magic with the Mottaz jig. Note that Wicks adds a bit of security by adding pressure with his non-drill hand when drilling holes.[/caption]
The Drilling
Like a shop jig, there are several hole patterns on the toe and heel slider. Know which holes align with your specific toe and binding unit. Match them up before drilling. And if you need reassurance, use a pen/pencil to mark the proper holes before drilling.
Calm your nerves and drill. Use a binding mount specific drill bit, which can be had here. Defer to binding or ski manufacturer recommendations regarding hole diameter and depth. And ensure the drill bit goes in straight, which, with this jig, will be easy as the holes are lined and reinforced with deep brass inserts.

Glue/Screw/Tighten
Add your preferred glue to the holes. Place the toe unit on the ski, insert screws, and begin to tighten. We prefer to hand tighten the front left screw, then tighten the rear right screw. Repeat the process for the front right screw and rear left screw. Once the four screws are hand tightened, the toe unit will be aligned. It’s the same process for the heel unit. Alternate hand tightening a front screw with the opposite side rear screw.
The moment of truth has come. Remove ski from the jig. Click the boot toe and heel into the binding. It all should be aligned. Take a breath.
Jig Thoughts
For less than a third of the price of an ATK jig, which again is a lovely item, Mottaz’s mock-up is spot on. The price is right; once the unit is assembled, it is highly functional.
Would we handle the jig with care? Several critical parts are 3D-printed plastic. Assume these parts would crack and or break altogether if dropped or mishandled.
Rigidity is also something to consider. The two aluminum T-slots running the length of the jig add rigidity, as do the 3D-printed clamp and slider units. As a precaution, we grip the jig and table (on which the mounting process is executed) with the non-drilling hand to add a measure of locked-in-place security as we drill the toe and heel unit holes.
The brass sleeves/drill bushing lining the drill holes are a nice feature that adds durability and helps ensure the drill bit sits snug (read that as minimal gap) in the guide hole.
We’ve done countless paper template mounts. On the whole, that method, if practiced before the deed, is reliable. Having a SlideWright Centering Tool makes that job easier and more efficient too. Using a reliable jig is just easier on the time and effort. However, you’ll be spending more money going the jig route.
Who is it for?
- The 3-D printed jig is for those meeting the following criteria.
- A DIY paper mount is dead on arrival.
- You’ve tried the DIY paper mount, botched it, and it is forever a non-starter.
- You are unwilling to purchase an ATK M06 MOUNTING JIG: ~$330, which is a lovely tool and highly recommended if you have a community of skiers who can help absorb the cost. Absolutely worth it for high-volume work.
- Still too pricey: the JigaRex at $260 + additional mounting plates at $50.00. For high-volume work, consider this jig.
- Unwilling to spend $50-$70 at the local shop for a mount. For many skiers, if you rarely, if ever, buy or swap out skis and bindings, having a local shop do the mount is a good option, and it allows you to support the locals. (That said, this editor is two for two on botched mounts at a local shop. I’ve had better luck with paper mounts, where I currently have a single botched mount—though it was a very bad botch.)
Additional Tools to Help You Out
The SlideWright centering tool ($42.00) and the Wintersteiger ski binding mounting drill bit ~$15-$20 available either locally or online.


Leave a Reply
You must be logged in to post a comment.