Planning make for efficiency: a traverse in the Wind Rivers

Brian Parker, D1 of D6 in the Winds. Parker is known for his fastidious traverse planning. Photo: Jason Albert

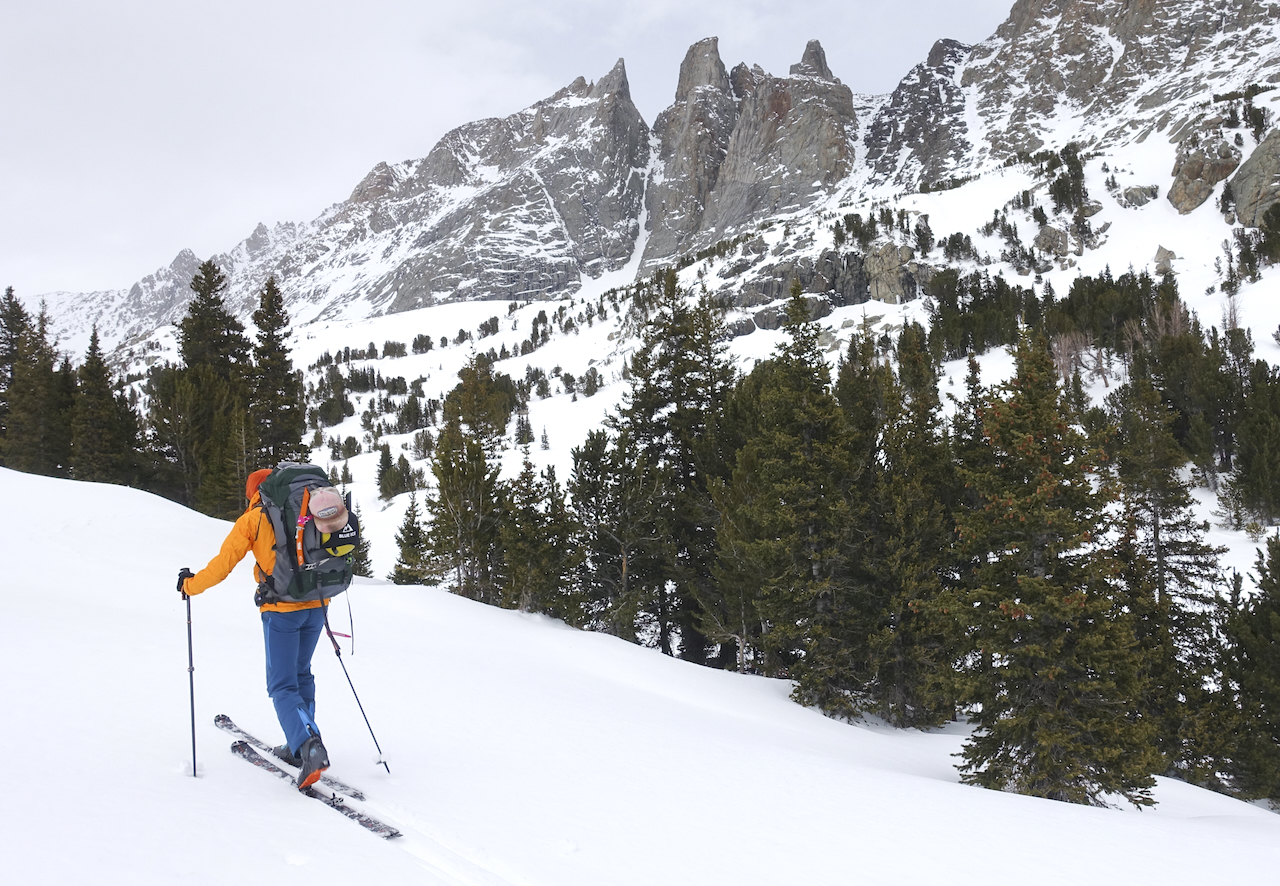
Moving across a mountain range on skis is a blessing. A ski traverse, for many, is the penultimate. Seek adventure, light out on a traverse. Here’s the first part in our series Planning a Traverse.


The Planning a Traverse series is a resource to help you…plan a traverse. We don’t take traverses lightly. The title here, including the term “first steps,” has some intent; it’s a multi-part process. Part planning. Many parts planning. And part doing. And part learning for the next traverse. We hope, through careful planning, you can successfully execute a traverse. Yet, we’re saying it (or at least writing it); we are not responsible for you while you plan a traverse or for the eventual traverse outcome.

Godspeed.

Just like a little human, learning to walk is critical. There are stumbles and bumbles along the way. We expect those. Before you know it, the bipedal thing takes over. It’s like that on skis too, and so too, by extension, is pulling off a traverse. What we are saying is to start small. Be success-oriented with your first traverse goal—choose a point-to-point or a circuit you can pull off in a day (24 hours). By starting small, you set yourself up for success when you inevitably reach out of your comfort zone.

In backcountry skiing, we mostly think of traverses as epic point-to-points. There’s the Chamonix to Zermatt Haute Route. Bugs to Rogers. Sierra and Wind River traverses and pushes across the Presidentials. If you live in a mountain town, even one with conical shield volcanoes, you, too, have a traverse or three on offer. Although, the point-to-point missions are what we think of as the classics, they often require some snafu-type logistics for first-timers. As we’re taking first steps—we’ll stick to first steps—there’s plenty of time to be young and brash on the second or third traverse objective.
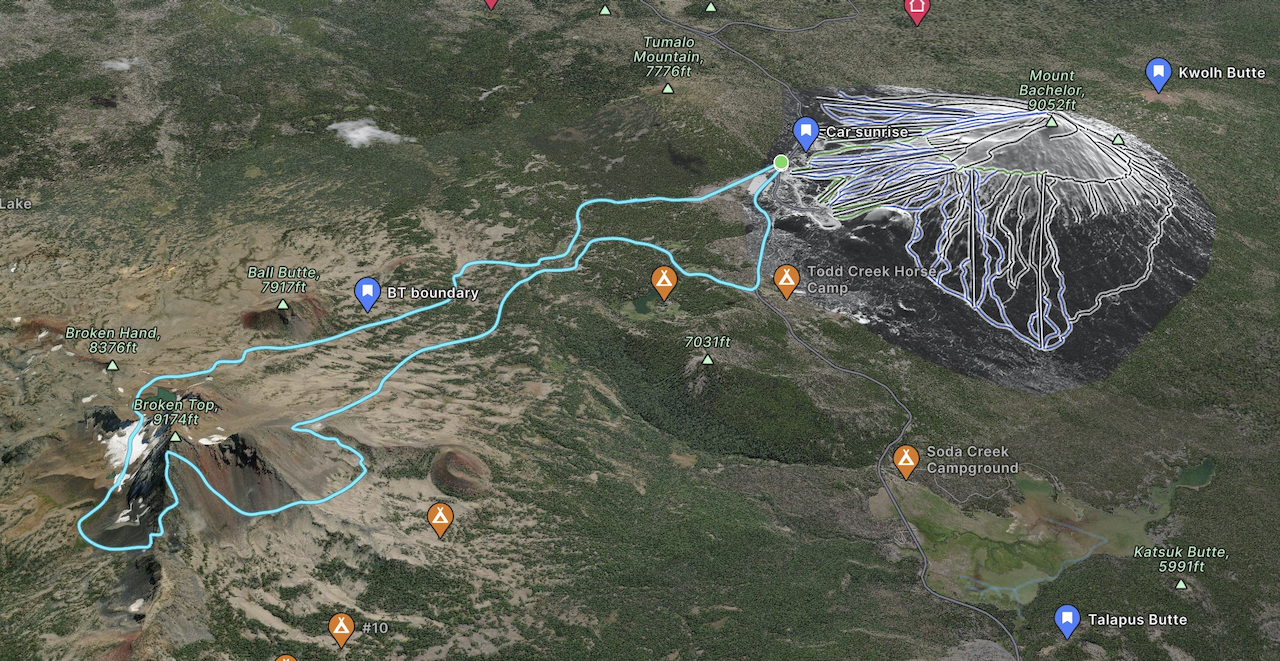
Circumnavigate Broken Top.

A good and basic intro traverse in the Cascades: circumnavigating Broken Top in winter. There’s nominal vertical gain, good views and plenty of options to yo-yo on specific aspects to extend the day. Total distance with little yo-yoing is 17 miles. A short enough distance to execute in day light hours.


Consider a Circuit

Consider a circuit to keep it simple. Start and finish in the same spot. A trip like this requires less planning and coordination. Circuits are also key in the event you must turn around. Someone could take an accidental dunk in a creek and that partner needs to pivot. Or a storm rolls in, or visibility is bunk. Pivoting, especially if you are less than halfway, is an easy decision to make. We’re taking a bias stance and claiming a circuit is more interesting than an out and back. An out and back has a sense of a preordained outcome — you’ve already been through the terrain once and know what to expect. In challenging ourselves, we want some calculated risk involved, which means to some degree, an unknown outcome. What better way to embrace this than covering new ground but ending up right where you started? There’s some Zen in there when you consider the power of a rambling ski circuit. And really, we want a positive outcome so you can start planning the next traverse.

FATMAP aspect shading

An easy to read rendition of slope aspect and terrain. This image is used to determine a proper exit strategy from the northern end of the Winds.


Considering Slope Aspect

The slope aspect is important to consider if questing out on a circuit. As the route progresses, you will likely be on more than a single slope aspect. Ensure you’ve looked at an avalanche forecast if it is available, and take note of the potential avalanche problems and how they might differ and evolve from aspect to aspect. Also, discuss with your partner what time of day you plan on crossing specific aspects and the amount of sun each aspect might receive. For example, locally, it is nice to circumnavigate the local volcanoes in winter or spring and yo-yo up and down some of the better skiing aspects as a bonus. If we expect significant warming throughout the day, we plan to hit east to south to southwest-facing slopes early. This strategy is more critical in the spring, as the days are longer and the sun reaches higher in the sky.


Time of Departure

Perhaps you are opposed to dawn patrols. On the morning of your departure, make an exception. Even in winter, if you are new to traverses, starting in the dark with a headlamp makes sense. A pre-dawn start gets you on snow early and creates a buffer of extra daylight later on if your pace is slower than expected. If your speed is on target, and the distance of the circuit is on the conservative side, you can finish near sunset or shortly after. The upshot is with the sun low in the sky; even the midday sun casts lovely light. And an early time of departure puts you on and across potentially suspect slopes when they are firm and less likely to sluff or slide. Bring ski crampons on a traverse, even in mid-winter. Side hilling on steep, firm terrain is no fun and wastes energy. Sidehilling or ascending on these slopes with ski crampons makes it way more efficient.


Terrain Terrain Terrain

When choosing a route for your nascent traverse resume (this is not a job, it’s better than that), think about prevailing winds in your specific range and how that might impact overhead hazards. Again, a circuit or a traverse involves some complexities a typical route plan might not consider. For example, our local zone typically sees winds out of the southwest. Understanding where slopes are loading and cornices are building is somewhat predictable. The problem of planning a safe route for an extended journey is trickier when you’ll likely be traveling across all aspects.

We state the following with open eyes; use the terrain to motivate you. Plan a route where at least a portion of it is new terrain. Seeing unfamiliar places and eyeing the potential for future tours keeps the mind engaged and draws you toward the next ridgeline.


Mapping the Route

Long before sliding on snow, map your route. We’re no Luddites; pick your favorite map app and generate your route. Although a virtual experience, if you are familiar with the terrain (first steps), you can cross-reference what you see on the map with the terrain’s ground-truthed vagaries.

For example, does the map show open water on your chosen route? Is it accessible in winter and spring? If yes, is it potable? If not, does it make sense to carry the day’s water from the start or carry a stove and brew mid-traverse?

Best to go light with the skis, boots, and bindings.

The skis are skinny, ~80mm underfoot, and the boots light with heaps of ROM. Photo: Jason Albert


What to Carry and What’s on Your Feet?

Your first planned traverse shouldn’t entail bringing a much heavier or bulky pack than for a typical wintertime tour. Some add-ons are the extra capacity to carry water if carrying a stove is ruled out and possibly some extra layers for traveling at night. This brings to mind that a spare headlamp battery is a must. If it is spring, and you’re timing your launch with high pressure, forgo the 3-layer storm-repelling jacket and pants, and bring a light windbreaker like a Houdinin or BD Distance wind shell and pants that ventilate well.

Another good idea if you expect to be out for at least 9-12 hours (or more) is to bring spare socks. Even if life is solid and your first traverse is a cruiser, swapping out for a fresh pair of warm-dry socks is a pick-me-up. Never underestimate fresh socks.

We are not yet offering an exhaustive and itemized packing list for full-blown traverses that you can modify for shorter 24-hour pushes. (That will be coming.) The important piece is thinking about moving fast, which often means lighter but not missing key items to help facilitate success or mitigate pitfalls.

The last thought on gear, for now, if planning longer excursions that are less descent-focused and more moving across the landscape focused, is considering what boots, skis, and bindings you use. Ideally, you have a 1 kg boot, a minimalist binding, and skinnier, lighter skis. Mid-winter, we’ll take a 95mm waisted 170cm lightweight boards if we expect deeper snow in sections. In true spring conditions, when descents are not prioritized, an 80mm underfoot plank in either 170cm or 178cm has been golden. There are stronger folks than us out there. Use what gear you have on your first traverse. See how it all plays out. But certainly, traverses are when lighter and skinnier are preferred by many.

Boot, binding, and ski selections at The High Route are not prescriptive. They are ideas about what we have settled on after making some mistakes. One thing is for sure: to cover ground, and lots of mountainous ground, a descent-oriented, freeride, big-mountain, whatever-you-prefer-to-call-it setup will ultimately bog you down. If multi-day traverses are in your future, consider a lightweight setup.


Fitness

Be in control of some of the on-route outcomes. Nobody likes feeling like crap. Make good fitness a priority. Stamina, endurance, and strength (physical and mental) are key to any successful traverse. If you work full time, look for high-quality training opportunities — opportunities like gaining vert lapping the uphill route at your local ski hill. Some high-intensity workouts might be part of your jam, and we know those fast pushes, when timed properly, have huge benefits. But be mindful that going long and slow will set you up for building a motor capable of a sustained effort in the mountains. This is to say, don’t off-the-couch your first traverse. You’ll likely regret it, as will your partners.

Worthy reading is Training for the Uphill Athlete.