Finding a riser sweet spot on the skintrack isn’t intricate. We discuss some of the variables affecting the sweetspot. But, as a general rule, the greater your boot’s range of motion, the less likely you’ll need a high riser on a well-set skintrack.


In steep terrain, high risers come in handy.

Pete Vordenberg, here in steep terrain, ponders the low to high riser dilemma.


INCLUDE A TABLE WITH SOME DELTAS ETC.

Digdeep to think of anything that gets the core community of backcountry skiers more torqued this way or that than discussing risers. It’s the stuff of holy decrees—no middle ground. Ski-specific forums and comment sections are the human behavior gold mine illustrating the depths we’ll go to defend or deride almost imperceptible difference between risers. 

But let’s clamp down the volume of the verbal cage fight. First, the pacifist in me says each to their own. I’ll not pontificate on the riser or no riser or the low or high riser schism: in this time of tech binding bounty, purchase a binding with the riser options you like. Mount bindings. Start skinning.  

Let’s begin with some mechanical basics when deploying a riser. Imagine you are ascending a moderate skintrack set at 15 degrees. In flat mode (no riser), you’ll have the greatest range of ankle flexion as your stride is longer. Flip a low riser into place, upward progress requires less ankle flexion, and you’ll notice, too, less muscle strain over time. If the skintrack kicks up, this might even require the high riser. Again, even less ankle flexion is required to slide the ski upward, but your weight shifts towards your forefoot, which might precipitate some skin slippage. 

There are several solutions to dialing in the proper riser height: it comes down to binding and riser preference, and boot choice.

Choose a boot that meets both your ascending and descending needs.

The stiffer yet less ROM boot Tecnica Zero G Tour Pro, and the less stiff, but greater ROM Salomon S/Lab MTN Summit.


The Touring Boot Variables

Beefier boots, marketed as downhill-focused freeride boots, often have four buckles and a power strap. Built with more rigid plastic composites, these boots tend to have more friction at the cuff pivot and are stiffer overall, even with buckles loosened and power strap tension eased off. Generally, skinning is more taxing in these heftier boots.

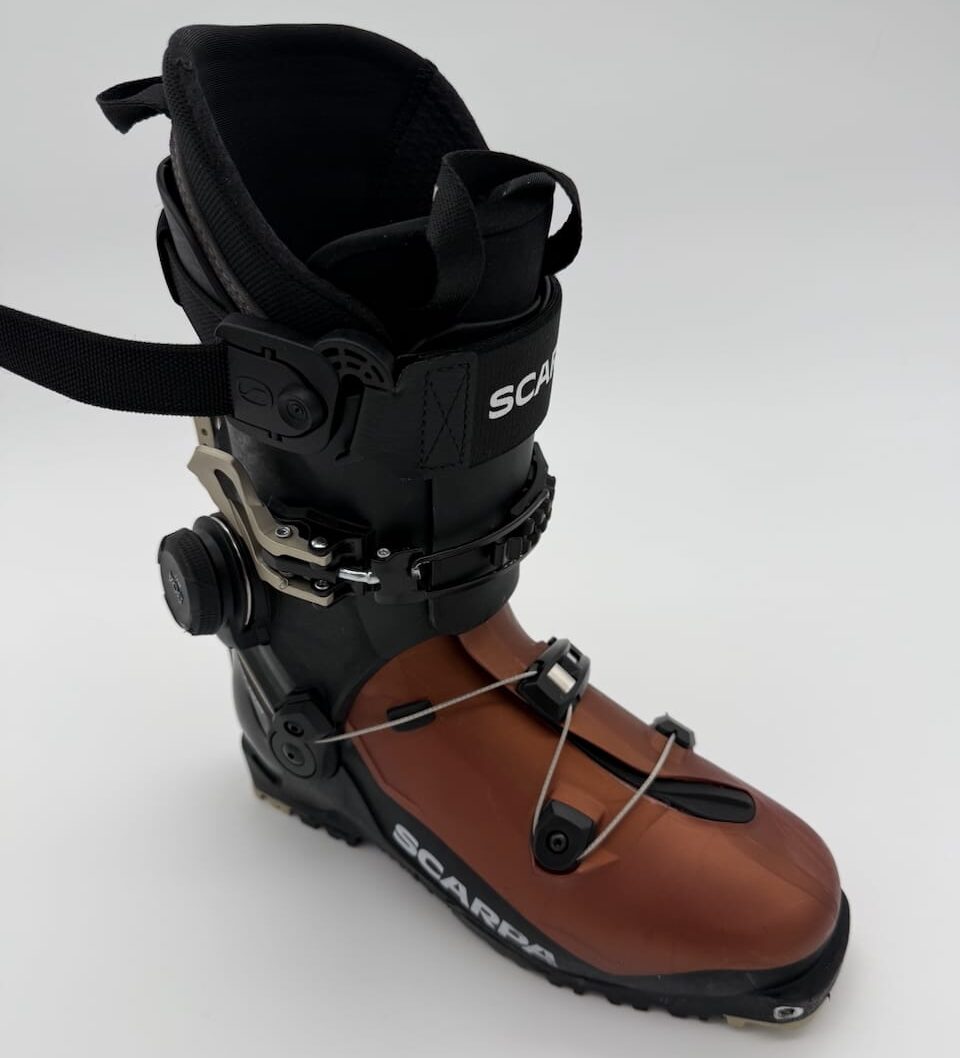
Speed touring boots, boots in the 1 kg class, are likely to employ an upper power strap and single lower buckle or BOA type closure to secure the foot while descending. Even with a stiff carbon cuff, these boots are designed with greater ROM and less friction overall when in tour mode. These designs allow for more ankle mobility and longer and more flow-like skinning strides. 

The stiffer boot will likely mandate a different riser deployment strategy to maintain ascending efficiency and bio-mechanical comfort. Here’s an example. On a moderate skintrack, again, around 15 degrees, the stiffer boot requires more force to flex the ankle, which ultimately shortens your stride, and tires you out; this is an opportune time to deploy the low riser.

In the later 1kg class boot, striding and skinning up the same slope feels near friction-free; the ankle flexes properly with less resistance, affording you ample grip and a long stride with no riser deployed. 


The Give and Take with Risers 

We’re making the point that with lighter, greater ROM boots, there is more latitude considering using a low riser or not. 

If descending is more your jam, seek a binding that, at a minimum, has a riser option, and really, it doesn’t need to be too extreme, which facilitates efficiency while in a freeride type boot. The thing to be aware of is if you often default to a high riser. Regularly using a high riser in a stiffish boot is a sign the skintrack is, indeed, a steep skintrack.  

Or if you are establishing the path, since the high riser shortens stride length, you’re incentivized to set a steep track to offset the shorter strides. But our motto is to be suggestive, not prescriptive: you do you.

Ski tourers in the 1kg class boots can remain in flat mode and use either the low or high riser, depending on how steep the skintrack is, to make efficient upward progress.

In the gallery slider below, the ATK Crest 10’s low and high riser give a 47mm and 60mm bump, respectively, when ascending.

The Tecnica ZG Tour Pro is a a great option for a relatively lightweight hard driving boot at just over 1400g in a 27.5. It’s ROM and pivot friction are more than acceptable even for long days. But it is definitely a descent oriented boot that will prompt you into a heel riser sooner rather than later. On the complete flip side is this skimo setup:

The Hagan (ATK) Ultra World Cup with the lone riser deployed. As a race binding, the riser flips over the pins.

The Hagan (ATK) Ultra World Cup with the lone riser deployed. As a race binding, the riser flips over the pins.

This is a skinny ski (65mm underfoot Hagan Ultra 65) and a race binding in the Ultra World Cup, and a swanky massive ROM boot in the Scarpa Alien 1.0. We’ll get busy about using skimo setups for non-skimo racing in another piece. But here’s the thing: with the near frictionless pivot and generous ROM, it’s possible to skin flat terrain with the lone riser deployed. Note there’s an adjustment plate under the heel unit, which adds ~4mm of stack height. Overall, with the plate, the riser height (over pins) is ~40mm. For some perspective, with a  beefier boot, even one in the 1kg class (a good ROM) like a Scarpa F1LT or Dynafit Blacklight/TLTX, a 40mm riser just doesn’t feel right on the flat. With the skimo race boot, it’s barely noticeable except to those weened and raised on classic nordic skis.


Binding Choice

Let us qualify something. Here at THR, we have different tastes. But we all share a similar vibe on flipping risers back and forth—it can be a pain. And it’s an even bigger pain if you must rotate the heel from flat to access a riser.

I mostly have ATK bindings allowing access to flat mode (no riser), and the high riser, without rotating the heel. The high riser in the models I use (BD Helio 200, BD Helio 200 LT, and the ATK Crest 10) are 50mm, 55mm, and 60mm, respectively. Not crazy high, considering I cut my teeth on iterations of Dynafit’s Speed Turn (still an excellent and reliable binding) with a nearly 90mm high riser. Readers, that is a high riser!

For 90% of the skintracks I’m on, no matter the boot, I can find efficiency and comfort in flat or high-rise mode, with the caveat that the high riser isn’t too high. 

In the same boots and bindings, I use the low riser (which means the riser is flipped over the pins like a skimo race binding) when I’m yo-yo-ing a short run, or have a moderately steep, several thousand foot, skintrack to ascend. This scenario offers a more consistent track considering steepness and fewer overall transitions between flat and riser. And atop the line while transitioning, it’s easy enough to flip the riser to expose the heel pins, step in, rip skins, and descend.

Let’s drill down on a scenario. Teton National Park is a region with long approaches. Usually, there’s a mile or so of flats; then it kicks up. And up. In this instance, having a single option for a riser is not a hassle, even if you must rotate away from flat mode to use the riser. You rotate the heel and engage the riser once (once the flat is over), and ascend. It makes sense that Gavin and others use bindings like Ski Trab’s Gara Titan Pro or the Plum R-170; they require heel rotation to engage a riser. But where they ski, the need to rotate the heel unit is minimized by the terrain.

This is likely another discussion altogether, but if you expect lots of rolling terrain in your local region, opting for bindings with flat+riser in the same heel orientation makes sense. 

Plum R-170 riser.

Plum R-170 binding with race style riser deployed over the pins.

Considering the Riser Delta

Let’s revisit the riser height numbers. It reminds me of the principle of absolute and apparent brightness for stars. Our sun appears big and bright. It appears to be the biggest and the brightest because it is so close. But from an absolute perspective, our sun is only average in brightness and size. Let’s not confuse celestial bodies with ski tools (but we’ll make an exception); riser heights are lower (in absolute terms) once the boot toe is secured in the binding. 

The simple reason is this: manufacturers measure riser height as the height of the riser from the topsheet. But, when your toes are locked in and supported by the toe pins, which are elevated above the topsheet, it lowers the effective riser height. For example, if a low riser is 30mm from the topsheet, and your boot toes (where the pins interface) are 10mm above the topsheet when locked in touring mode, you get a 20mm advantage with the low riser deployed. Even still, the riser hits the boot sole heel, and your foot is inside. You may use heel lifts and a custom insole, and heel pin inserts on boots are not universal in height— all this affects, although to a relatively small degree, a risers effective height 

This difference (riser height delta) is something to consider if you are drilling down on riser height measurements and comparing brand to brand or model to model. But don’t stress too much. Just key in on keeping the skintrack efficient, not too shallow, and not too steep.

In the gallery slider below, the G3 ZED’s low and high riser give a 55.5mm 71mm bump, respectively, when ascending


Where Does this Leave You?

A range of riser heights are likely acceptable, say 28mm-35mm for a low riser and 40mm-55+mm for a high riser. And depending on the boots you use, you may never deploy the high riser. And other skiers may poo-poo flat mode altogether, especially when using a high ROM boot and a low riser — in this case, skinning on flattish terrain feels pretty natural. 

With longer and wider skis, I tend to wear beefier boots with less ROM of motion, and I adjust my skinning style accordingly. The two more robust winter boots I regularly ski are the Fischer Transalp Pro and the Tecnica Zero G Pro Tour. The Fischer offers a greater ROM, while the ZG Pro Tour is stiffer for descents. Either way, I am quicker to engage a riser in these boots with the same bindings than in a lighter high ROM boot like a Dynafit TLT X or Dynafit Blacklight.

We’ll repeat it; find what works for you. Still, some general rules apply. If you quickly hit up the high riser, especially in high ROM boots, you are likely on a too-steep skintrack. The Skintrack setting, that’s a whole other story.