We continue our discussion about avalanche safety and signal acquisition. We caught up with Greg Mears, who works for ORTOVOX USA, to further discuss signal acquisition. 


(Disclaimer—Mears is an old neighbor/friend from my days in Colorado and is known to have once thrown an excellent murder mystery who-done-it-party. Turns out my wife was the caper. But that’s another story.)


Read our first story on signal acquisition.


***


Course Search and Signal Acquisition 

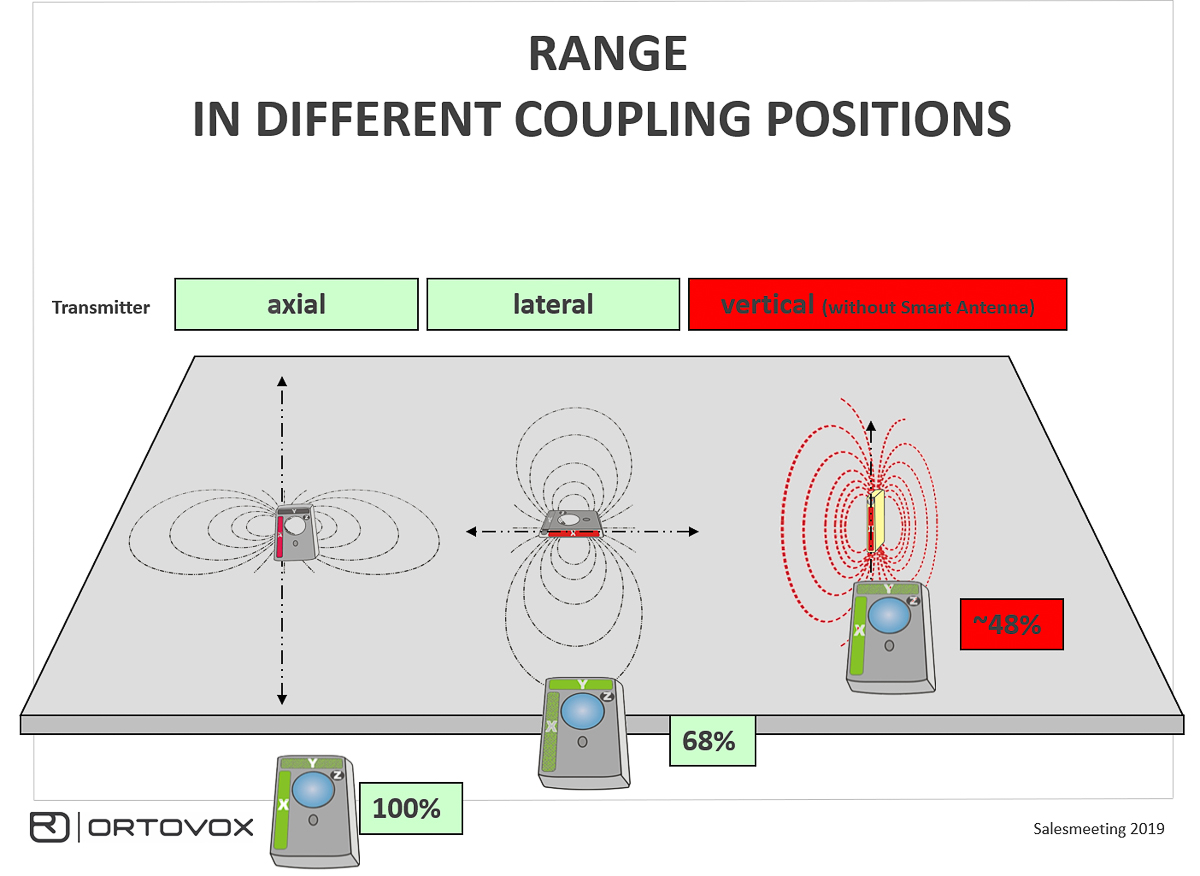
The High Route: Earlier, we posted an article on The High Route discussing signal acquisition in transceivers. So, let’s talk about that and folks practicing that in the field. Essentially, we want to explore why it is important to go out and practice when the sending beacon is in numerous orientations. Let’s begin with what you folks refer to as the optimal orientation for the sending transceiver. 

Mears: The optimal orientation is called parallel alignment. The antennas, in the search and sending transceiver, point towards each other rather than being perpendicular to one another. When you are in a parallel, or optimal alignment, we expect to acquire the signal under the optimum range of your device.

In an ideal scenario, in a quiet electromagnetic situation (no EMI), and the sending transceiver is positioned in its optimal orientation, the receiving transceiver should acquire a signal at the high end of the signal acquisition range. For example, if the receiving transceiver is the DIRACT VOICE, the maximum search range is 50m (search strip width)—in the optimal orientation, signal acquisition should occur around 30-40 meters (equivalent flux line distance).


An Ortovox image illustrating parallel (axial), perpendicular (lateral), and vertical coupling.

An Ortovox image illustrating parallel (axial), perpendicular (lateral), and vertical coupling.


THR: As we’ve discussed, real scenarios are often not ideal. Securing and locking on a signal during a search can be both routine and complex. Let’s talk about some of the difficulties in acquiring a signal. 

Mears: What’s important to learn is how to interpret what’s going on based on the information you’re receiving on your device. With more practice and training in signal acquisition and beacon searches, generally, under non-optimal situations, the better it will be, ultimately, for the searcher. They’ll be more prepared, hopefully, during an actual scenario to interpret and understand what low distance readings or an erratic, unstable signal means because they’ve simulated it and practiced it. 

If you’re not picking up that signal at that optimum range, it can cause stress. Maybe the user stops or truncates their search because they wonder, “Where’s the signal?”  

Like you did in your practice scenario, where you place the sending signal in a vertical orientation, or at least perpendicular to the receiving signal, all those scenarios are going to help prepare you for what happens when now, instead of 70 meters, it takes 40 meters to acquire the signal or even less. Now, hopefully, you’re prepared for that and not always expecting signaling acquisition at or near the maximum range. 

Suppose it takes a bit to securely acquire the signal as you’re doing your strip search, and you wonder, “Why haven’t I acquired the signal by now?”. In that case, you are likely in a situation where the victim, or at least the transceiver, is in a vertical orientation, which is why you haven’t received the signal yet. 

Or here’s another potential scenario; you may intuit that there’s interference to your receiving beacon, and that’s why the search field has been narrowed, signals become erratic and inconsistent, especially directional arrows, and the ranges are reduced

Practicing in these imperfect situations can help with that knowledge, and that’s born through experience and training. All this can help you realize it’s gonna happen; keep moving. You’ll get a signal, and let’s not be overly preoccupied with range.


THR: I want to take just a slight step back. In any live rescue situation, you have no idea how that sending transceiver is oriented. So, having optimal orientation, meaning both the sending and the search transceivers are oriented the same way, is not a given. 

Mears: Correct. Some statistics and studies have been done to determine the averages of optimal orientation (parallel) and poor orientation (perpendicular). The vertically aligned sending transceiver is not the average, apparently. And I forget precisely what it is, but maybe 15 to 25% of the time, the victim’s beacon will be in the vertical alignment. In other words, suboptimal for maximum signal acquisition. 


THR: Ok, let’s walk through some scenarios. I get caught up in maximum range—this or that transceiver can acquire a signal at 70m, so, therefore, I’ll be capturing that signal further, rather than closer to the victim. 

Mears: Yeah, I think that there’s a lot of value in setting up these signal acquisition scenarios, beginning with an optimal alignment scenario so you can get comfortable with the maximum range on your device and learn what that is. 

But then, if somebody is holding the sending transceiver, have them reorient the transceiver. You’ll begin to understand what a dropped signal looks like and how orientation affects range. Once it is reoriented, continue moving until you acquire the signal again and notice the difference. 

I tend to put a “flag” down at that optimal signal acquisition point—like in your informal test. I leave a glove or a hat as the marker; then I continue to move forward. 

The typical guidance is that we haven’t really acquired a stable, reliable signal until we can get three pulses and consistent distance and direction information. You don’t want just a single pulse or a single input of information. 

Here’s how that may look. You want to see distance measurement and a direction arrow indicator on the transceiver’s screen and have it replicate itself three times. You may need to step forward a couple more steps before it’s a stable signal. That’s what the avalanche educators will say: it’s not truly a stable signal until it replicates itself three times, three pulses, and it’s stable on the screen.

I then mark that point along the way as my confirmed signal acquisition.

I then change the orientation of the sending transceiver to vertical, the poorest orientation possible, and repeat the process. This allows me to see what that difference is graphically; whether in your local grassy park or on the snow, you start to understand your transceiver’s varying ranges and how orientation can influence it. 

Most instructors will agree that signal acquisition is the most critical phase because once you get on the flux line and you get closer, the signal gets stronger, and as a signal gets stronger, it’s more stable. The information becomes more reliable and consistent. The search tends to progress more quickly and simply until we get to a fine search. 

However, If you don’t have a stable signal during signal acquisition, and you respond to that information, which may be incorrect, and you move aggressively, the signal may get dropped, and that is probably one of the most stressful things for a searcher—trying to determine where the signal went.

Often, people don’t follow the guidance: When you first acquire that signal, you pause for a second to make sure it’s stable; even then, mark that point. 

This is the point where you may come off of your strip search because you think you have a stable signal. Many people forget this step—dropping a marker like a ski pole—and they proceed on the directional arrow. Again, drop a marker as your backup point. 

If, for some reason, that signal wasn’t stable and you moved in the incorrect way, or maybe your device is not working as it should, or there’s some interference, or you interpreted it incorrectly, you have that backup point where you can come back to that signal again and reset.

There are many scenarios where this may happen. It can happen, in particular, at longer ranges (>60 meters) where signals tend to be weaker, from EMI to either or both sending and receiving devices or even from user error in how they manage their searching device. 


THR: Let’s talk about range. And let’s focus on the idea that maximum range is an ideal, and often, a unit’s maximum range is somewhat situation-specific. 

Mears: What we have learned and experienced at Ortovox is that there are pros and cons to devices with greater range. 

The greater the range of the device and the ability of the antenna to pick up the signal at, say,  70-80-100 meters, is that correspondingly, at the same time, the signal can be weaker at that distance. Meaning less reliable. So the further out you are with your device when you acquire a signal, it requires you to be more diligent to make sure it’s stable. 

Testing has shown that with electromagnetic interference, devices that pick up the signal at a greater range tend to be more subject to interference than those with less range.

You might ask, “Why does this matter to me?”

The short answer: because it can slow down your search. In an avalanche rescue scenario, when first trying to acquire a signal during the start of the course search, the signal-to-noise ratio can be very small, and any interference can be detrimental. Time is of the essence, and the clock is ticking. Ghost signals and false directional arrows can send you off in the wrong direction and waste time. Reduced range means you must reduce your search strip width and get closer to the buried victim before you get a reliable signal. This is when it is most important to reduce the number of EMI sources.

 A good study by the Black Diamond crew came out last winter. They did a nice recap of EMI, and the basic takeaway was that a transceiver is more susceptible to interference at longer ranges. The two most common things that affect range are the sending transceiver’s orientation, as we have been discussing, and electromagnetic interference.  

As a company, Ortovox has placed greater emphasis on signal stability over range, and not compromising signal stability for the sake of greater range. By design, our devices tend to be less susceptible to interference than, say, a device with bigger “ears.”

Again, it’s good to practice those scenarios where there may be EMI and become more familiar with stable signals and the possible ranges you can encounter when acquiring a signal. 

I’ll go back to this: arguably, the most important part of the search is signal acquisition. The key point here is when people make that initial entrance onto the flux line, it is as accurate as possible. And, of course, the closer we get, the stronger the signal, the less likely there will be an error.


The Instability Corridor

THR: The whole point here is to understand the variability in signal acquisition and move efficiently but with patience. It doesn’t necessarily mean that you’re in the wrong part of the debris field if you’re searching for someone and the signal is funky; maybe you haven’t moved far enough forward to get a strong signal.

Mears: There’s a term we use at Ortovox called the instability corridor. There is a corridor around the searcher where the signal can become unstable or, for example, drop.  The width of that corridor relates to the range the searcher is from the signal.  At greater ranges, the corridor for instability is greater, and more care and precision are required for the searcher to maintain the signal. 

Again, that’s been Ortovox’s brand’s philosophy for years: We optimize signal stability over range, which is a fancy way of saying we have less range. We don’t believe that range is always a positive thing. It can be misleading, and in the hands of an inexperienced user, it may not be the best thing to have 100 meter range versus 40 meter range, because there’s this zone of instability. That zone becomes greater at greater ranges. 

One way to put it is your bridge to exit the strip search and into the flux line is skinny at 70 meters. If you acquire the signal at 30 meters, you get this big, wide boulevard. It’s much harder for you to hit that flux line at 70 meters; you need to be a bit more accurate, and there’s a greater zone of error possible there. Greater range means less likely to have a stable or a more tenuous signal and greater potential for instability at greater ranges.

Professionals understand that. And professionals are used to those instabilities. They know how to work through them. And so if they see jumpy direction signals, say, two right, one left, two right, one left, or 70 meters, 50 meters, and back to 70, that’s when they realize they might be dealing with an unstable signal, EMI, greater ranges. They know from training how to continue the search while being prepared to lose the signal and return to the last point with a signal. Most importantly, they are trained not to become stressed, confused, and delay their search. 

At the initial point of the signal acquisition during the signal search, we must be careful about exclusively relying on the device, especially at greater ranges, because those signals may not be stable. 

You may also need to use your eyes. Your intuition. Your common sense. Look for items on the debris field and look at the slide itself. Experienced searchers won’t rely exclusively on the device during the single acquisition phase; they want to use their eyesight and common sense. They won’t have “beacon blindness,” so to speak. 

So if the device isn’t stable right away, they don’t place all their faith in it, which means they don’t stop and wonder why it’s not accurate, and they don’t always necessarily respond to information if their intuition says maybe that’s not right. 

Coming full circle, that’s why it’s key to mark that signal acquisition point, but to continue, proceed, and keep moving because our goal is to get a strong signal. The more we keep moving in the direction where that signal is stronger, the more we can almost exclusively focus on the screen and follow the arrows. 

This is what we’ve seen. Brands like Ortovox and BCA are more in the 40 – 50 meter range. Get to know your specific tool. You don’t want to be under stress if you use a transceiver for the first time, especially in a group scenario, and your partners have acquired a signal, and you haven’t yet. You need to be prepared for that, and through practice and training, you will realize that’s okay. This all comes through knowing your device, training with it, and learning your optimum ranges under different scenarios.


The Fine Search

THR: Ok, we discussed the signal acquisition phase. Now, let’s pivot to the fine search. 

Mears: During the fine search mode, the best practices are that as we are moving along and bracketing that fine search grid, we need to maintain the device in the orientation in which it first picked up the signal—which is typically parallel to the snow surface (perpendicular to your body).

The searcher is not rotating the unit; you’re not moving it along its axis but rather along a grid relative to the snow surface. Even if you come in at an angle, and that’s where the signal is acquired, you still move the device at an angle, and you keep it on the grid, or bracket line. 

You have to be very still and very careful not to move the searching beacon’s orientation or relative distance from the snow surface. During the fine search, the unit employs its third antennae, a small disc-shaped antenna that searches vertically in the snowpack—it becomes active in that under-three-meter range. At this point, it becomes more incumbent on the searcher to maintain proper alignment. It is something that can be controlled. You’ve got to be disciplined here—any unalignment affects the outcome of the distances you’re seeing in fine search, and whether they’re consistent.


THR: Give us another way of visualizing not rotating the unit during fine search. 

Mears: In a fine search, we are no longer relying on those X and Y antennas. We’re relying on the vertical plane, that third antennae, what I call the z-axis. It’s picking up that signal, and again, it will skew that fine search if you move that search beacon around with your wrist. 

Don’t move the transceiver around like the hands of a clock—if you picked up the signal at 9 o’clock, keep it at 9 o’clock—(like point at 9 o’clock and then 10 o’clock) and keep the transceiver at a fixed height above the snow surface when bracketing.  

Some brands are now saying not to keep the searching transceiver right on the surface. Be at a point where you can be as close to the surface as possible without having to lower the transceiver and raise it because all of that can misalign it and throw the readings off. Find that point where you can get the transceiver as close to the surface as can be without moving the alignment. So, yeah, that becomes much more incumbent on the searcher then. 

It’s also important to practice enough to understand the lowest point your device will display—that they don’t go to zero.(The distance reading on the search transceiver notes how far below the surface the buried transceiver is.)

Further, it’s important to understand what the lowest point your transceiver will acquire a signal from during the fine search. For Ortovox, is it 0.2m. A new user unfamiliar with the product might expect the reading to eventually go to 0.1m.  

Lastly, users need to understand how quickly the range will adjust in fine search and to recognize the audible tones, how those provide information, and how to interpret the information.