On this north facing slope: moving from sun to shade. It's ok to begin touring with much of your downhill (on-piste) clothing. As you progress, and take on bigger objectives in a broader mix of potential weather, you'll begin to infill the the clothing niches specific to the endeavor.

On this north facing slope: moving from sun to shade. It’s ok to begin touring with much of your downhill (on-piste) clothing. As you progress, and take on bigger objectives in a broader mix of potential weather, you’ll begin to infill the the clothing niches specific to the endeavor.


IFMGA Guide Jediah Porter has been fine tuning his backcountry skiing layering system for years. In this sartorial guide, Porter offers valuable advice for those just building out the clothing ensemble to those infilling gaps with niche pieces.


At a tumultuous turning point in life, over 10 years ago now (and, therefore, more than 10 years after reaching “adulthood”…), I joked that I had “just started dressing myself.” With only a decade, therefore, of “experience,” I’m no huge authority. But I know that one can always learn about clothing, especially in the mountains. I have skied for decades and am always learning something about clothing. For instance, did you know that a Norwegian company makes awesome cotton ski touring pants? Did you know that those might be a great idea, sometimes? Anyway, maybe something below will speak to you. 

Let’s talk about your backcountry ski clothing in terms of your backcountry ski career “progression.” From your first trials to full expedition-level commitment, you will acquire and employ clothing in different, advancing, and wardrobe-accruing fashions. 

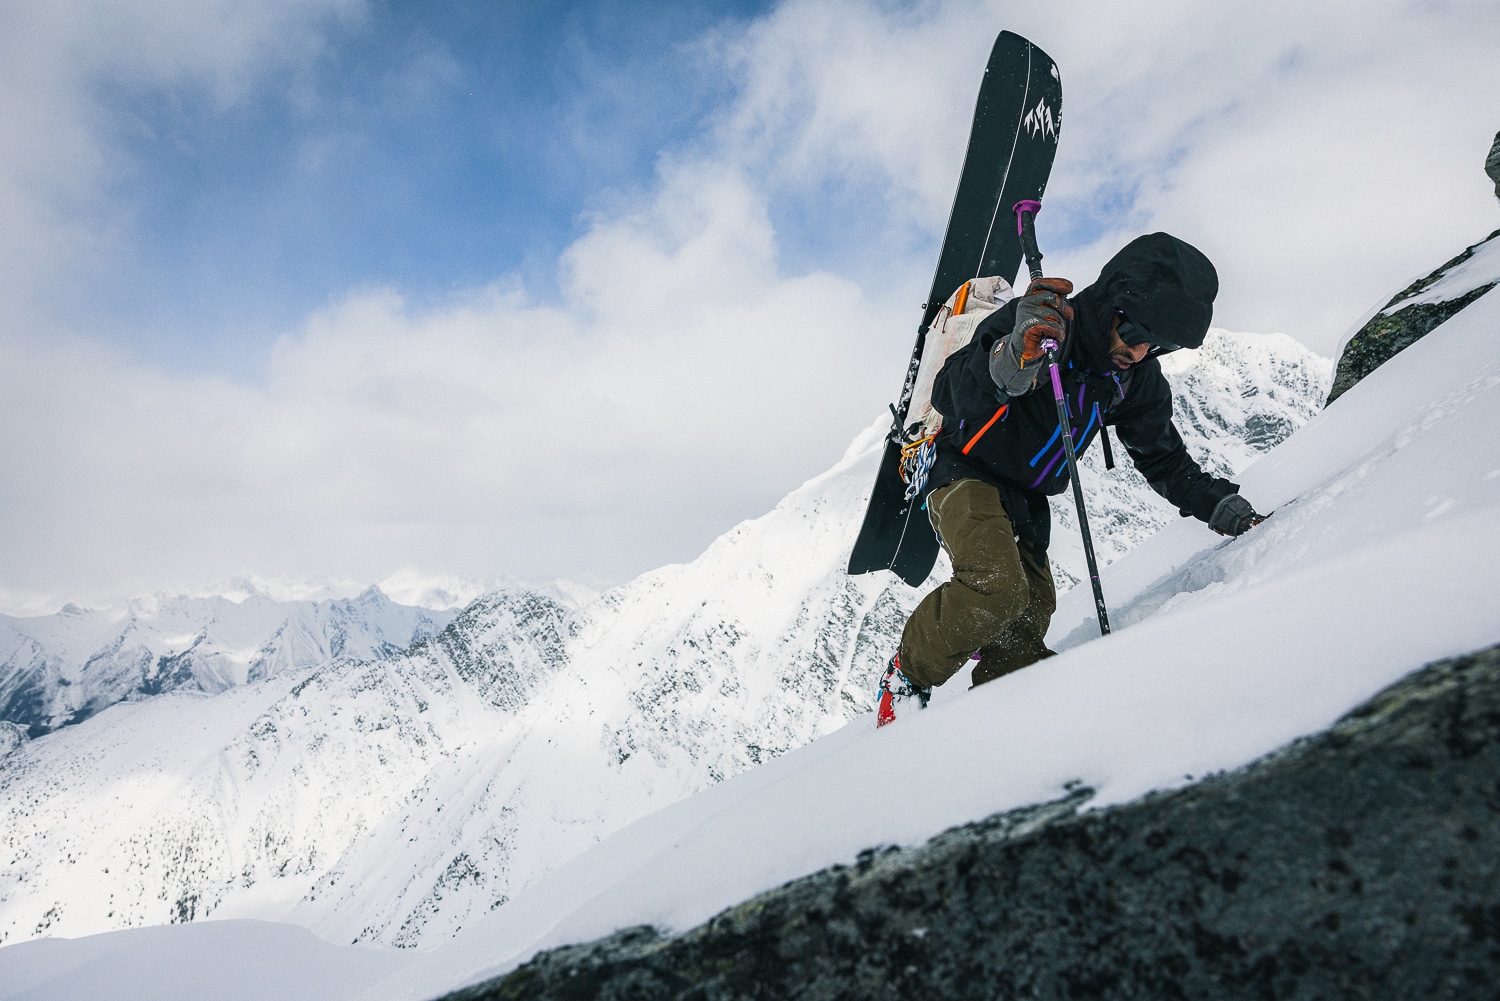
All this assumes some level of familiarity with the basics of outdoor weather protection: Fit is key, materials matter, “be bold, start cold,” carry enough warmth to stand/sit around, etc. 


Phase 1: Your very first human-powered skiing 

(TLDR? Use your regular resort clothes, but add a sun hat and sunglasses.)

Let’s assume that you have a pretty healthy and comprehensive ski resort wardrobe. (This isn’t a bold assumption; you probably oughta have a pretty healthy and comprehensive ski resort background before your first backcountry ski excursions.) We’re talking hardshell tops and bottoms, various base and insulating layers, and random “accessories” for the appendages. (Throughout your ski career, don’t let a lack of the “perfect” outfit stand in your way. People have been slogging and skiing and enjoying in heinous conditions since long before nylon. Nonetheless, enhance your experience with some attention paid to how you dress.)

What might you need to grab from this collection, how should you wear it, and what might you want to add for this first foray? Top to bottom: 


  • First, a side note on your backpack, as it pertains to clothing—choose a backpack big enough to hold all but your lightest possible worn-uphill “action suit.” This means that you need to be able to stuff shell layer and insulating layers and extra gloves and extra hats inside. And, too, the pack is configured to somehow secure a helmet and goggles. And, of course, sized to carry all the other stuff that is beyond the scope of this article. In short, there’s a reason that backcountry ski backpack manufacturers market their 20 liter backpacks to “sidecountry” and their 30 liter backpacks to typical human powered backcountry skiing. Yes, your skimo bro might be able to make it work with a 20l pack. But that’s the exception. 
  • Helmet and goggles. You’ll tour up without wearing these things. Be able to carry both in some secure fashion, without swinging around, and, importantly, without getting snow onto goggle lenses. For me, that means the goggles go in a soft bag and then inside the helmet. When I can, that package goes inside the pack. When I can’t fit that, that package goes into my backpack’s purpose-built, stretchy helmet holder. Most ski-specific backpacks have these helmet holders. You can also buy one after market. 
  • Brimmed hat and sunglasses. The brim keeps both snow and sun off your face; bring it every time. The sunglasses protect eyes from sun, wind, and sticks; bring ’em every time. 
  • Warm hat. In my system, it is mainly for style points. I wear the brimmed hat on the way up, a helmet on the way down, and hoods for warmth. 
  • Buff/”neck gaiter”. A zillion uses. 
  • Light base layer top. Wool, synthetic, whatever. Simple. Long sleeves or short; personal choice. 
  • Light insulating layer. Fleece, usually. But it could be wool or puffy or something else. I like mine with thumb loops, a close-fitting hood, and a chest pocket (my phone lives in the chest pocket of this layer). 
  • Thicker insulating layer. Again, fleece could work, but puffy insulation is best. Down or synthetic, run what you got; don’t sweat it too much. I like mine to have a hood and a full front zipper. 
  • Your resort shell jacket—whatever that looks like. 
  • 2-3 pairs of handwear. Definitely some thin ones (often sold to resort skiers as “spring gloves”) for the uphill. Definitely your standard resort warm gloves. Ideally, if you got ’em, some warmer, shelled mittens tucked in the bottom of your pack. 
  • Undies. Duh. But, if you can, make ’em synthetic or wool. And thin. 
  • Light base layer bottoms.
  • Resort ski pants. Use those zipper vents like it’s your job. Be cautious about insulated ski pants. Be even more cautious about bibs…too warm, too difficult to dump heat. 
  • Socks. Whatever socks you like in your resort boots. If you have a choice, keep ’em thin and consider how the uphill striding motion will change their fit. Socks that work just fine locked into downhill mode might slide around or fall down off your calves during skinning. Tighter is better.
A Buff, softshell pants, a lightweight wind jacket (no Gore-Tex) , and enjoying lunch.

A Buff, softshell pants, a lightweight wind jacket (no Gore-Tex) , and enjoying lunch.


Phase 2: “I’m gonna do a lot more of this. And equip myself accordingly.”

You’re past the “trying it out” phase. You’re buying beacon-shovel-probe and proper touring skis, bindings, and boots. You have arranged your life to include 3-30 day trips per season of backcountry skiing in a variety of typical, classic backcountry locales (Tuckermans, Berthoud, Marble, Wasatch, Tahoe, Teton Pass/Park, spring volcanoes, Revelstoke, Alps, Thompson Pass, Selkirk huts, etc). You might still pull some apparel “pieces” from your resort kit, but you also know that resort and backcountry skiing are different enough to reward dedicated outfits. 

This is a list describing your entire wardrobe. You’ll pick and choose from this list for any given day. You will seldom bring it all on any one tour. 

  • Helmet and goggles. Your resort kit is still totally appropriate. But one of those lighter, backcountry-targeted options on the market (from Smith, BCA, etc) is also nice.
  • Brimmed hat and sunglasses. Always. 
  • Warm hat. Again, stylie, and in most systems, surprisingly optional. Yes, you will see ski touring guides wearing their “beanie” all day long. But they are also operating at about 50% of their aerobic capacity. They require more insulation when going at a slower pace. They take that beanie off when going their own pace.
  • Buff/”neck gaiter”.
  • Light base layer top. Wool, synthetic, whatever. Simple. Long sleeves or short; personal choice.
  • Light insulating layer. Thin fleece with a hood, thumb loops, and a chest pocket. Like the venerable Patagonia “R1 Hoody.” I like mine even lighter than the R1. The Black Diamond Coefficient LT Hybrid Hoody hits the sweet spot in my world these days.
  • Sun hoody. On any given day, you’ll choose between a sun hoody or the light fleece from above. You’ll likely never use both at any one time. If, like me, your “system” involves carrying your phone in a chest pocket, finding a sun hoody with a chest pocket is important. And possible. But not easy.
  • Light insulating layer. Thin, synthetic, puffy insulation is best. Or one of those “air permeable” insulated jackets. Under a pound, hooded, breathable, smooth outer fabric for snow shedding.
  • Bigger insulating layer. Down or synthetic. One to two pounds. It’s not wrong to have two jackets in this category to choose from. I like to have two: a synthetic fill jacket with a sturdier, weather-proof shell for stormy/wet weather and day-to-day ski touring, plus a classic hooded-down sweater style for drier days and lighter missions. Specific recommendations from my collection: Arc’Teryx Beta (or Rush) Insulated Jacket and Arc’Teryx Cerium Hoody.
  • Hooded windbreaker. 4-6 ounces, snowproof, water resistant. Dozens of options on the market. Softshell, or more classic windbreaker style.
  • Light, waterproof shell. 6-10 ounces, hooded, sturdy, truly waterproof. Also, many dozens of options are available—full zip or pullover. Seldom carried, even less often worn, crucial when required. Yes, seldom used even in those “wet” climates nearer the oceans. Your protective shell is better prioritized on your bigger, synthetic insulated parka, as described above.
  • Light shelled mittens to live in the bottom of your pack “just in case.” Then choose on any given day between one of the following:

Thin “spring” gloves

Warmer, day-to-day gloves. By this time in your BC skiing career, you should have tried enough different gloves to identify approximately what level of insulation you require for a full day of ski touring. Identify, choose, and settle on those for uphill and downhill.

  • Undies. As above
  • Light base layer bottoms.
  • Softshell ski touring pants. Many options. You want breathable, snowproof, wind resistant. You want a beacon pocket, vents, and cuffs that easily cover your boots but allow for rapid transition access. These are your workhorse backcountry ski pants. You might sometimes choose your resort pants if it is really stormy or really cold, but that will be rare.
  • Very light shell pants. Tucked in the bottom of your pack, seldom used. Used for wetness and for cold. You want full side zips and a weight of less than 10 ounces. Bonus points if the cuffs are broad enough to fit over open touring boot cuffs.
  • Socks. Last but not least. First priority is blister prevention. Work out your system for this. It will take time. For many, it is the last and slowest of the bc skiing skills to dial in. You are not alone if that describes you; it’s a battle, but you can figure it out. It’ll take boot work, liner adaptations, skin toughening, sock selection, taping origami, and maybe some chemical intervention (in the form of antiperspirant). Next, consider the interplay of friction, durability, fit, and warmth. Touring saws through socks; all that striding motion means feet slide around inside liners. You want the socks to be taking that stress, not your skin. You want enough thickness to protect but not so much as to constrict. You want ’em to fit close enough that the sock stays stuck to your foot while the sock and liner rub together. As noted way above, you need these socks to stay up on your ankles/calves. Some have no issues with this; for others, it is the bane of their existence. Yes, warmth matters, but not more than blister prevention. Blistering feet won’t stay out long enough to get cold. Cold feet don’t sweat, so they are less likely to blister. In short, don’t worry too much about how your socks affect the warmth of your feet. Wool stinks less but wears out faster. What does it all mean when mashed together? I am very, very discerning about my ski touring socks. I’ve shopped long and hard and am constantly on the lookout. In recent years, I’ve settled on the Dissent GFX Compression Hybrid DLX-Wool. Yeah, that’s a mouthful. And it’s a spendy proposition. We’re looking at upwards of $50 for a pair! But, you can’t put a price on morale, and happy feet make happy skiers. I wear that model of sock in every ski circumstance in my life. And in many other circumstances as well. I have no affiliation, but, Dissent, if you’re listening, I’m down.
Always smiling in the hills—and always bring a hat to provide sun protection.

Always smil in the hills—and always bring a hat to provide sun protection.


Phase 3. “Human-powered skiing is my life”

Below is what I own and how I think about my clothing collection. From this, I can select an outfit for an hour of intervals at the resort or for a month-long expedition in the steep Arctic. Or anything in between. If you fall somewhere between the above “enthusiast” and this neurotic lifer, some subset of the below will serve you well. 

  • Helmets. A ski resort helmet and a climbing helmet. Resort helmet for normal ski touring and most ski mountaineering. Climbing helmet for wicked light and missions with a more technical ascent. On the climbing helmet, tape the front vents closed (from the inside, because fashion) so you can perch your goggles without fogging them.
  • Brimmed hat and sunglasses. Always. Brim keeps the sun and the falling snow off your face.
  • Goggles. Most of the time. Carried in a full coverage, lightweight bag. Multiple lens options available. Figure out, in advance, how your goggles will work with your climbing helmet. However, climbing helmet ski missions don’t always involve goggles.
  • Warm hat. Mainly for the drive and the first few cold minutes of touring
  • Buff/”neck gaiter.
  • Wool t-shirt. I start every mountain mission with one of these.
  • Long sleeve layer. Hooded, chest pocket, thumb loops. Choose one:
    • Sun shirt.
    • or light fleece
  • Light insulating layer. Choose one of these:
    • Arc’teryx Proton FL Hoody. Breathable and warm. 
    • Arc’teryx Atom SL Hoody. Less insulation, more wind resistant. 
    • Shelled, thin synthetic puffy. Like the Arc’teryx Nuclei family. For the coldest, wettest, and/or most committed expedition settings. 
  • Bigger insulating layer. Choose one of these: 
    • Arc’teryx Rush Hooded Jacket. Day to day, go-to. 
    • Arc’teryx Cerium hoody. Cold and crisp day trip ski touring. 
    • Feathered Friends Helios Hoody. For super cold, dry days and for typical “lower 48” overnight camping trips.
    • Expedition down parka. For Alaska etc. 
  • Shell jacket. Choose one of these. Usually, the windbreaker. If it is going to be stormy and wet, I’ll first upgrade the bigger insulated jacket to one with a shell before I add a dedicated waterproof shell jacket: 
    • Hooded windbreaker. 4-6 ounces, snowproof, water-resistant. 
    • Light, waterproof shell. 6-10 ounces, hooded, sturdy, truly waterproof. 
  • Hand wear:
    • Light, shelled mittens to live in the bottom of your pack “just in case.”
    • Thin gloves. I like the $20-35 “fancy” work gloves from the hardware store. 
    • “Spring” gloves. Very lightly insulated, somehow. Either something like light ice climbing gloves or the skimo-dorky style that is a light glove with a stowable mitten cover. 
    • Warmer, day-to-day gloves. I use these 80% of the time. My current choice is the Camp K Warm. Own two pairs. 
    • Modular expedition gloves. Removable liner, sturdy leather fingers. 
    • Expedition mittens. Down insulated, leather palms, long gauntlet. 
  • Undies. I wear synthetic Patagonia boxers every day of my life. Some of mine are still in use, dating back to 2009 and before. Yes, I have pictures to prove it. No, you won’t see those. Women, by this time in your mountain career, you’ve had better guidance and mentorship than I’ll ever be able to provide. Everyone, be intentional here. 
  • Pants. I am particular about pants. I like the right “feeling” against my leg skin. Not everyone with my commitment level to the mountains has this many ski pants in their arsenal.
    • Light base layer bottoms. Seldom worn, in my world. I just don’t like wearing long johns. If I did, the following collection could be smaller. 
    • Softshell ski touring pants. The workhorse. As described above. 
    • Very light shell pants. For carrying and, usually, not using. 
    • Insulated resort ski pants. Yes, I ski tour a fair amount in insulated ski resort pants. Here in the cold Tetons, 15-20 days per year. See the above notes on guides and pace and such. I don’t really recommend you do so. But, if you are drawn to the idea, consider this your “license” to do so. 
    • Cotton ski touring pants. Norrona makes them. They are a dream. It’s like wearing sturdy Dickies, but with a cuff that fits over your ski boots and the right combination of pockets for skiing. I use these for short, cold powder days. And for sunny, warm corn days. I once thought this was a ridiculous idea. But I’m now fully sold. 
    • Skimo “training tights.” Warmer and looser than a full race kit. Very comfy for short training missions, long high-pressure day excursions, and just the ticket for high-pace, expedition-length ski traverses. Currently, my choice in this category is the Crazy Idea Acceleration Pant. Buy them a size larger than your normal size. I’m a medium in everything, all the time, except for these Italian pants; I use a large. 
  • Expedition foot warmth. Overboots and heated socks. Look no further than Outdoor Research and Forty Below for your overboots. Start and stop your heated sock search at Lenz. 
  • Socks. See way above.